There is an excellent instructional on how to make spring pins on Scott Martin’s site (Borealis Steel), here: Spring Pin Construction.
The first two images show a technical side view. In Fig. 1 we see two armor plates connected with a spring pin assembly. The Locking Pin is permanently attached to one plate (Helmet Material in this case), and passes through a hole in the other plate (Visor Material), thus locking them together. In these images, the bottom of the pic represents the inside of the helmet. You’re looking down on the top of the helmet and the wearer is facing rightward: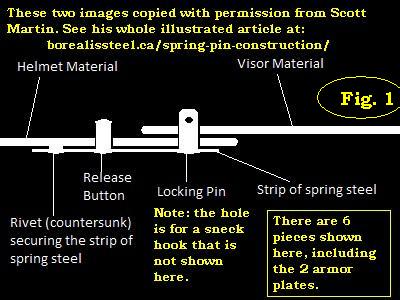 The tiny hole in the Locking Pin is how the visor gets locked into a closed position. A sneck hook is often used for this (not shown above) which gets attached to the outside of the helmet, and can be easily flipped up out of the hole when the wearer wishes to open his visor, and also easily flipped back down through the tiny hole once he has closed his visor again.
In Fig. 2 we see the wearer has pressed the Release Button (pin), which forces the spring strip to flex inward, and subsequently the visor of this helmet is no longer held to the helmet by the Locking Pin: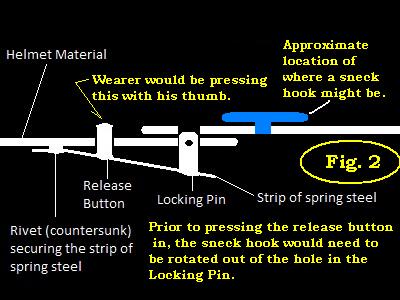 Thanks to Scott Martin who has permitted me to use his excellent pics for this page. (I added some details, in yellow and blue.)
The main points of the procedure as Scott demonstrates are:
- Understanding how it works
- Selecting materials: spring strip, two main pins, rivet(s)
- Sizing and cutting a spring plate
- Marking the armor for spring strip placement
- Sizing and cutting both the spring pin and the release pin
- Rounding the ends of both pins
- Filing shoulders on both pins
- Drilling a small hole in the locking pin for a sneck hook
- Drilling holes in the spring strip
- Punching matching holes in the armor (exact placement!)
- Pean the release button pin onto the spring plate
- Fill the sneck hook hole with the drill bit shaft
- Pean the locking pin onto the spring plate
- Rivet the spring pin assembly onto the armor
Until I document construction of one of these myself, please do read Scott’s article. His tutorial is worth the time.